2020-02-13

C# Nullable Reference Types: IntelliSense Confusion

The feature and concept of Nullable reference types were introduced in C# 8.0 and it basically made all types non-nullable by default and ensured that these types could never be assigned the value null. This is one of my favorite features in C# recently, but there are scenarios where a mixed nullable environment could cause confusion.

Confusion

To enable the assignment of the value null to a type, you have to explicitly mark that type. This uses the same concept of nullable as introduced in C# 2.0, where you, for example, make an int nullable by adding a question mark after it: int?.

When we look at a regular example service-class, we can see which benefits can be had from Nullable reference types:

public class ProductService
{
    // This method accepts a non-null string for 'productId'
    // and always returns a string
    public string FormatProductId(string productId)
    {
        // ...
    }

    // This method accepts a nullable 'formattedProductId'
    // and returns a string or null
    public string? TryGetProductName(string? formattedProductId)
    {
        // ...
    }
}

This makes things all fine and clear. We know that the method FormatProductId never returns null and that it doesn't accept null in its parameter. We also know that the method TryGetProductName returns a string which could be null and that the parameter accepts a string which could be null.

This is great, this means that we don't have to perform a null-check on productId-parameter of the FormatProductId-method, right? Well, not exactly...

Confusion: Mixed nullable environments

In an environment where all your code has Nullable reference types enabled, you can trust the output of a method and the input to its parameters. In a mixed nullable environment, things are not as straight forward, especially when you look at how IntelliSense in Visual Studio signals what to expect from the code.

Scenario 1: Modern app & legacy library

Imagine that your new modern app has Nullable reference types enabled, but you're using an external library that is legacy and does not have this enabled. This external library can be your own old library or something you've included from NuGet.

The problem now becomes that the external library is signaling, for example, that it has a method that returns a string and not a string?, so you should be able to trust that it is not null, right? Unfortunately not. Even with a local non-nullable project, IntelliSense tells me that the returned string is not null, even when it is.
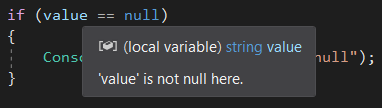
Value is not null

Scenario 2: Legacy app & modern library

Imagine that you have just put together a nice library that you want others to use, either in your project, organization or publicly through NuGet. One of the best parts about using Nullable reference types is that the compiler will warn you if you try to send in a null value as a parameter to a method that explicitly states that it doesn't support null.

Nice, now you can clean out all those noisy null-checks at the top of all the methods, right? Unfortunately not. Your code might be used by another assembly (or an older version of Visual Studio), which doesn't detect the non-nullability.

In a way, this means you have to reverse the way you do null-checks in your code.

public class ProductService
{
    // This method does not accept a null-value
    // and if it does, it should throw an exception
    public string FormatProductId(string productId)
    {
        if (productId == null)
            throw new ArgumentNullException(productId);
        // ...
    }

    // This method accepts null-values
    // and should adjust its logic accordingly
    public string? TryGetProductName(string? formattedProductId)
    {
        return
            formattedProductId != null
            ? GetProductName(formattedProductId)
            : null;
    }
}

Key takeaways

My own take-aways from exploring this aspect of Nullable reference types are:

  • When building a library, always check for null in incoming method-arguments, even when Nullable reference types is enabled
  • When consuming an external legacy library, don't trust the return-type to not be null (even if it says it's not)
  • In a mixed nullable environment, the feature to guard us against NullReferenceExceptions is likely to mistakenly cause some more of them
  • When this feature is fully adopted, there will be a reduction in a lot of the overhead in null-handling code

Thoughts

Hopefully, in .NET 5, this feature is enabled by default and these kinds of confusions, and described associated errors can be avoided.

One idea for an improvement to the IntelliSense-behavior around assemblies that are not known to have Nullable reference types enabled could be to show all these types as nullable. Both because it makes things super-clear, but also because of the fact that they actually are nullable.

This change would make everything in the whole .NET Core CLR light up as nullable, but as of .NET Core 3.1, it all is nullable, by definition.

2019-07-15

PowerShell LINQ with Short Aliases

Most modern applications or code today deal with some kind of filtering or querying. In C# and .NET, we have Language Integrated Query (LINQ), which we also have access to in PowerShell, because it's built on .NET.

To list the top 10 largest files in the Windows temporary folder, which is larger than 1 Mb and starts with the letter W, skipping the first 5, ordering by size, the C#-code with LINQ would look somewhat like this:

new System.IO.DirectoryInfo(@"C:\Windows\Temp")
    .GetFiles()
    .Where(x => x.Length > 1024 && x.Name.StartsWith("W"))
    .OrderByDescending(x => x.Length)
    .Select(x => new { x.Name, x.Length })
    .Skip(5)
    .Take(10)
    .ToList()
    .ForEach(x => Console.WriteLine($"{x.Name} ({x.Length})"));

The equivalent logic in PowerShell has a bit of a more daunting syntax, especially if you're not used to it:

Get-ChildItem "C:\Windows\Temp" `
| Where-Object {$_.Length -gt 1024 -and $_.Name.StartsWith("W")} `
| Sort-Object {$_.Length} -Descending `
| Select-Object -Property Name, Length -First 10 -Skip 5 `
| ForEach-Object {Write-Host "$($_.Name) ($($_.Length))"}

That's a bit explicit and verbose, but if you use the command Get-Alias in PowerShell, you will see a lot of useful aliases, which make the syntax a bit terser and easier to get an overview of:

gci "C:\Windows\Temp" `
| ?{$_.Length -gt 1024 -and $_.Name.StartsWith("W")} `
| sort{$_.Length} -Descending `
| select Name, Length -First 10 -Skip 5 `
| %{write "$($_.Name) ($($_.Length))"}

In a real scenario, you probably wouldn't write each result to the console, but let PowerShell present the result in its default grid format.

2019-06-27

HTML Encode TagHelper in ASP.NET Core

For a specific scenario recently, I wanted to display the HTML-encoded output of a TagHelper in ASP.NET Core. So I wanted to use the TagHelper, but not output its actual result, but see the raw HTML which would have been included in my template.

HTML

So I created another TagHelper, which allows me to wrap any HTML, inline code in ASP.NET Core and other TagHelpers, and get all the content inside the TagHelper's tag to be HTML-encoded, like this:

<html-encode>
    <a href="@Url.Action("Index")">Read More</a>
    @Html.TextBox("No_Longer_Recommended-TagHelpers_Preferred")
    <my-other-tag-helper />
</html-encode>

From this, I will get the raw HTML of the link with an UrlHelper-result, the result of the HTML-helper and the result of my other TagHelper.

The source-code for the html-encode-TagHelper is as follows:

[HtmlTargetElement("html-encode", TagStructure = TagStructure.NormalOrSelfClosing)]
public class HtmlEncodeTagHelper : TagHelper
{
    public override async Task ProcessAsync(TagHelperContext context, TagHelperOutput output)
    {
        var childContent = output.Content.IsModified
            ? output.Content.GetContent()
            : (await output.GetChildContentAsync()).GetContent();

        string encodedChildContent = WebUtility.HtmlEncode(childContent ?? string.Empty);

        output.TagName = null;
        output.Content.SetHtmlContent(encodedChildContent);
    }
}

2019-02-18

API Rate Limit HTTP Handler with HttpClientFactory

Most APIs have a Rate Limit of some sort. For example, GitHub has a limit of 5000 requests per hour. This can be handled, as a consumer of the API, by limiting your use by timing your requests to the API or through caching of the results.

What about when an API limits your requests per second? This is probably something you would want to handle somewhere central in your code and not spread out everywhere where you make an HTTP call to the API.

Funnel

For me, the solution was to add a Outgoing request middleware to the setup of the HttpClientFactory.

With this, I can just configure the startup services to use this RateLimitHttpMessageHandler-class with the HttpClientFactory:

services
    .AddHttpClient<IApi, Api>()
    .AddHttpMessageHandler(() =>
        new RateLimitHttpMessageHandler(
            limitCount: 5,
            limitTime: TimeSpan.FromSeconds(1)))
    .AddDefaultTransientHttpErrorPolicy();

This ensures that wherever I use the class IApi, through dependency injection, it will limit the calls to the API to only 5 calls per second.

The simplified version of code for the RateLimitHttpMessageHandler:

public class RateLimitHttpMessageHandler : DelegatingHandler
{
    private readonly List<DateTimeOffset> _callLog =
        new List<DateTimeOffset>();
    private readonly TimeSpan _limitTime;
    private readonly int _limitCount;

    public RateLimitHttpMessageHandler(int limitCount, TimeSpan limitTime)
    {
        _limitCount = limitCount;
        _limitTime = limitTime;
    }

    protected override async Task<HttpResponseMessage> SendAsync(
        HttpRequestMessage request,
        CancellationToken cancellationToken)
    {
        var now = DateTimeOffset.UtcNow;

        lock (_callLog)
        {
            _callLog.Add(now);

            while (_callLog.Count > _limitCount)
                _callLog.RemoveAt(0);
        }

        await LimitDelay(now);

        return await base.SendAsync(request, cancellationToken);
    }

    private async Task LimitDelay(DateTimeOffset now)
    {
        if (_callLog.Count < _limitCount)
            return;

        var limit = now.Add(-_limitTime);

        var lastCall = DateTimeOffset.MinValue;
        var shouldLock = false;

        lock (_callLog)
        {
            lastCall = _callLog.FirstOrDefault();
            shouldLock = _callLog.Count(x => x >= limit) >= _limitCount;
        }

        var delayTime = shouldLock && (lastCall > DateTimeOffset.MinValue)
            ? (limit - lastCall)
            : TimeSpan.Zero;

        if (delayTime > TimeSpan.Zero)
            await Task.Delay(delayTime);
    }
}

2019-01-10

Azure Storage Easy Web File-Hosting

In an ambition to improve my blog a little bit, I wanted to include more images in the posts but felt a lack of a good solution for web file-hosting. To find the best fit, I put down a check-list of features and criteria. The solution I was looking for should or must check the following:

  • Ownership of the files: If the solution used disappears tomorrow, you can still access my files.
  • Predictable URLs: The URL to the resources should never change. You don't want to have to update all your blog-posts or other external links floating around the internet.
  • Good tooling: Avoiding slow web-upload, when uploading multiple and/or large files, but also easily getting an overview of your files.
  • (Bonus) Pretty URLs: "Pretty" looking URLs are easier to check for copy-paste errors, but could also potentially benefit SEO.
  • (Bonus) Low or no cost: Since there are free services out there, paying for file-hosting must be worth it.
Images & Tech

Non-fitting Alternatives

When I started evaluating alternatives, a while back, Flickr was still a thing. The problem was that I couldn't predictable directly link to an image I've uploaded. After feeling all the obstacles, which indicated that using Flickr for image-hosting was being actively blocked, I understood it was too much of a hack.

Historically, I've been using Google's image hosting through Blogger, which is where this blog started out. The problem was that this also felt like I hack and I was always worried that the URLs would change and I'd have to go through every single blog-posts I've ever made and update all images.

Services like Dropbox and Google Drive seem to actively try to block the use of their services for this, even if they are accessible through the web.

Azure Storage for easy web file-hosting

Enter Azure Storage, with its widespread adoption, familiar interface and extremely affordably priced Blob Storage. It checks off all my points in the checklist and more. Giving it's backing, it's fair to assume more functionality will be added ongoingly.

Azure Blob Storage can be used to store data-blobs of almost any size in the Azure-cloud. By providing a path/key, you can read or write to that "file" at that "path". The overall performance of Azure Storage is great and also an important feature of the service, but the simple mechanisms of Azure Blob Storage make it very fast.

Expose blob-content to the internet

So you could build a web-app which accesses your files on Azure Blob Storage and expose them through URLs in your API, but you can also let Azure handle that for you, by activating anonymous read access to your blobs.

You can do this on blob-level, so you can have a dedicated blob for public files, separately from your other blobs in the same Storage-account. These files will be read-only when you use the option Blob (anonymous read access for blobs only), found under the Access policy-section of the selected blob.

Upload files

Then you can use the Azure Portal, programmatically use the Azure Blob Storage API to upload files, or you can use application Azure Storage Explorer, for a friendly GUI-experience to get started.

Azure Storage Explorer

Now you can share your files anywhere you want, via the provided URL from Azure or through a more pretty URL, using a custom domain.

Add a custom domain

To fulfill the criteria of pretty URLs, you can set your own custom domain for an Azure Storage-account. If you do not do this, the default URL for Azure Blob storage is https://{storage-account-name}.blob.core.windows.net/{file-path}.

Activate Azure CDN

This is a great start for your small project to start out with, but you can in the future easily transition into using the full power of Azure Content Delivery Network (Azure CDN) on your existing Azure Storage-account, simply by activating it from the Azure CDN-section in your Storage-account.

2018-12-29

dotnet-guid: Generate GUIDs/UUIDs with the Command Line

There have been a few projects, although not many, which I've been involved in, where generating GUIDs/UUIDs has been important. For that, I used to use online-tools like https://guidgenerator.com, but when I switched machine, the autocomplete in my browser lost that link.

Minimally for this reason, and mostly for fun, I decided to write a .NET Core Global Tool which quickly generates one or multiple GUIDs/UUIDs, in whatever format could be needed.

Installation

Download the .NET Core SDK 2.1 or later. The install the dotnet-guid .NET Global Tool, using the command-line:

dotnet tool install -g dotnet-guid

Usage

Usage: guid [arguments] [options]

Arguments:
  Count         Defines how may GUIDs/UUIDs to generate. Defaults to 1.

Options:
  -?|-h|--help  Show help information
  -n            Formatted as 32 digits:
                00000000000000000000000000000000
  -d            Formatted as 32 digits separated by hyphens:
                00000000-0000-0000-0000-000000000000
  -b            Formatted as 32 digits separated by hyphens, enclosed in braces:
                {00000000-0000-0000-0000-000000000000}
  -p            Formatted as 32 digits separated by hyphens, enclosed in parentheses:
                (00000000-0000-0000-0000-000000000000)
  -x            Formatted as four hexadecimal values enclosed in braces,
                where the fourth value is a subset of eight hexadecimal values that is also enclosed in braces:
                {0x00000000,0x0000,0x0000,{0x00,0x00,0x00,0x00,0x00,0x00,0x00,0x00}}
  -e            Defines if the GUIDs/UUIDs should be empty, using zero-values only.
  -u            Defines if the GUIDs/UUIDs generated should be upper-cased letters.

Examples

To get a single GUID/UUID, simply type:

guid

To get 3 random GUIDs/UUIDs, with letters in upper-case, formatted with brackets:

guid 3 -b -u

You can find the source-code on GitHub, the package on Nuget and the latest builds on MyGet.

You can find a great list of more .NET Core Global Tools on GitHub, maintained by Nate McMaster.

2018-10-17

dotnet-cleanup: Clean Up Solution, Project & Folder

We developers like to think of developing software as an exact science, but sometimes, you just need to wipe your source-files to solve some kinds of problems.

For .NET-developers, there are many issues on Stackoverflow which are solved by just deleting your bin and obj-folders. For people using Node.js, probably just as many answers contains the step of removing your node_modules-folder.

Those are some of the reasons why I created dotnet-cleanup, which is a .NET Core Global Tool for cleaning up solution, project or folder. This was made easy by following Nate McMaster's post on getting started with creating a .NET Core global tool package.

Deleted files and folders are first moved to a temporary folder before deletion, so you can continue working with your projects, while the tool keeps cleaning up in background.

Installation

Download the .NET Core SDK 2.1 or later. The install the dotnet-cleanup .NET Global Tool, using the command-line:

dotnet tool install -g dotnet-cleanup

Usage

Usage: cleanup [arguments] [options]

Arguments:
  PATH                  Path to the solution-file, project-file or folder to clean. Defaults to current working directory.

Options:
  -p|--paths            Defines the paths to clean. Defaults to 'bin', 'obj' and 'node_modules'.
  -y|--confirm-cleanup  Confirm prompt for file cleanup automatically.
  -nd|--no-delete       Defines if files should be deleted, after confirmation.
  -nm|--no-move         Defines if files should be moved before deletion, after confirmation.
  -t|--temp-path        Directory in which the deleted items should be moved to before being cleaned up. Defaults to system Temp-folder.
  -v|--verbosity        Sets the verbosity level of the command. Allowed levels are Minimal, Normal, Detailed and Debug.
  -?|-h|--help          Show help information

The argument PATH can point to a specific .sln-file or a project-file (.csproj, .fsharp, .vbproj). If a .sln-file is specified, all its projects will be cleaned.

If it points to a folder, the folder will be scanned for a single solution-file and then for a single project-file. If multiple files are detected an error will be shown and you need to specify the file.

If not solution or project is found, the folder will be cleaned as a project.

Example

To cleanup a typical web-project, you can specify the paths to be cleaned in the projects like this:

cleanup -p "bin" -p "obj"  -p "artifacts" -p "npm_modules"

You can find the source-code on GitHub, the latest builds on MyGet and the package on Nuget.

You can find a great list of more .NET Core Global Tools on GitHub, maintained by Nate McMaster.

2018-08-21

LINQ Distinct-Method using Lambda Expression

If you've ever wanted to filter a collection for a distinct result you probably know about the extension-method .Distinct in LINQ. It can be useful on simple data structures containing easily comparable objects, like I collection of strings or ints, but for more complex scenarios you need to pass in a IEqualityComparer. This is not very convenient.

More convenient would be to able to pass in a Lambda-expression, specifying what field you want to do the distinction by, like this:

var distinctItems = items.Distinct(x => x.Id);

To do this, you can add the following extension-methods to your projects:

public static IQueryable<TSource> Distinct<TSource>(
    this IQueryable<TSource> source, Expression<Func<TSource, object>> predicate)
{
    // TODO: Null-check arguments
    return from item in source.GroupBy(predicate) select item.First();
}

public static IEnumerable<TSource> Distinct<TSource>(
    this IEnumerable<TSource> source, Func<TSource, object> predicate)
{
    // TODO: Null-check arguments
    return from item in source.GroupBy(predicate) select item.First();
}

The extension-method using IQueryable<T> works with ORMs like Entity Framework, while IEnumerable<T> works with all types of collections, in-memory or otherwise, depending on implementation.

Warning: Avoid using this with EF Core version 1.x or 2.0, since the .GroupBy-execution is always made in-memory. So you might get the whole content of your database loaded into memory. Only use it with EF Core 2.1 and above in production-scenarios.

2018-08-10

API-Versioning in ASP.NET

The ASP.NET Route Versions-library was created after I was inspired by a discussion with a colleague and reading the great article Your API versioning is wrong by Troy Hunt, where he concludes that you don't need a war of preferences between different ways of versioning your API, you can actually support multiple ways in the same API.

In his article, Troy lists 3 ways (to do it wrong), which I have implemented for ASP.NET Core, and added support for one more way, which is URL versioning. This library supports the following ways to version your API:

  • URL versioning
  • Query string versioning
  • Custom request header
  • Content type

URL versioning:

HTTP GET:
https://my-web-app.com/api/v2/customers

Query string versioning:

HTTP GET:
https://my-web-app.com/api/customers?api-version=2

Custom request header:

HTTP GET:
https://my-web-app.com/api/customers
api-version: 2

Content type:

HTTP GET:
https://my-web-app.com/api/customers
Accept: application/vnd.api-version.v2+json

[RouteVersion]-attribute

All you need to do is use the [RouteVersion]-attribute on the Controller-Actions you want to version and provide the route-version as an argument:

[Route("api/v{api-version}/[controller]")]
[Route("api/[controller]")]
[ApiController]
public class CustomersController : ControllerBase
{
    [HttpGet]
    [RouteVersion(1)]
    public ActionResult<string> GetV1()
    {
        return "Get Customers Version 1";
    }

    [HttpGet]
    [RouteVersion(2)]
    public ActionResult<string> GetV2()
    {
        return "Get Customers Version 2";
    }

    [HttpPost]
    [RouteVersion(1)]
    public ActionResult<string> PostV1()
    {
        return "Post Customers Version 1";
    }

    [HttpPost]
    [RouteVersion(2)]
    public ActionResult<string> PostV2()
    {
        return "Post Customers Version 2";
    }
}

The attribute will only resolve versioning between Controller-Actions, everything else is handled by the regular ASP.NET Core routing, and behave as you're used to.

Configuration

In your Startup.cs you can configure what ways of API-versioning you want to support (all activated by default). You can also change the keys of the routing, query string, custom header and content type.

public void ConfigureServices(IServiceCollection services)
{
    services.ConfigureRouteVersions(options =>
    {        
        options.UseRoute = true;
        options.UseQuery = true;
        options.UseCustomHeader = true;
        options.UseAcceptHeader = true;

        // Set route-name in template used. For example: "api/v{version}/[controller]"
        // Default: "api-version"
        options.RouteKey = "version";

        // Set query string-key used. For example: "/api/customers?v=1"
        // Default: "api-version"
        options.QueryKey = "v"; // To use: '/api/customers?v=1'

        // Set custom version header used. For example: "my-app-api-version"
        // Default: "api-version"
        options.CustomHeaderKey = "my-app-api-version";

        // Set Accept-header vendor used. For example: "application/vnd.my-custom-api-header.v1+json"
        // Default: "application/vnd.api-version.v1+json"
        options.SetAcceptHeader("my-custom-api-header");

        // Set Accept-header regex-pattern. For example: "application/pre.my-custom-vendor-api.v1+json"
        options.AcceptRegexPattern = @"application\/pre\.my-custom-vendor-api\.v([\d]+)\+json";
    });

    services.AddMvc();
}

Default version

If you know that your new version of an API-endpoint is compatible with previous version, and if you want to support it, you can use the IsDefault-parameter with the [RouteVersion]-attribute. For example, if you've just added new fields to the next version and you find that is compatible enough to be the default version of the API-endpoint:

[Route("api/[controller]")]
[ApiController]
public class CustomersController : ControllerBase
{
    [HttpGet]
    [RouteVersion(1)]
    public ActionResult<string> GetV1()
    {
        return "Get Customers Version 1";
    }

    [HttpGet]
    [RouteVersion(2, IsDefault = true)]
    public ActionResult<string> GetV2()
    {
        return "Get Customers Version 2";
    }
}

Then you can make a call to the URL for the API-endpoint without specifying the version and get the default version, which in this example is v2:

HTTP GET:
https://my-web-app.com/api/customers/
> "Get Customers Version 2"

Contributing

You can find the source code on GitHub, the newest unstable build on MyGet and the latest version of the library on NuGet

2018-02-22

Azure Deployment of Mono-Repos in GitHub

With the increasing adoption of Microservices, one of the questions sometimes discussed is mono-repo vs. multi-repo, which tries to answer if you structure your code to have one large, single repository for all/multiple microservices or individual, small repositories for each microservice.

If you're in the scenario of using a mono-repo, where you have multiple projects in a single repo, and you want to deploy this single code-base to multiple applications and services in Azure, there is a simple way to do this.

Kudu, the engine behind git-deployments in Azure App Service, has documentation on how to customize deployments, but only one of these ways works well with the mono-repo-scenario. The approach of using a .deployment-file unfortunately locks the configuration of the specified project into your source-code, so it won't work for mono-repos.

Instead, using the Application settings available in all Azure App Services, you use the key PROJECT to set the value for the path of the project you want to be deployed to your different Azure App Services. So this solution works for Function Apps, Web Apps, API Apps and much more.

Example

If you have the following code-structure in your single repository:

  • /src/ExampleProject/ExampleProject.csproj
  • /src/ExampleProject.FunctionsApp/ExampleProject.FunctionsApp.csproj
  • /src/ExampleProject.WebApiApp/ExampleProject.WebApiApp.csproj
  • /src/ExampleProject.WebApp/ExampleProject.WebApp.csproj
  • /test/ExampleProject.Tests/ExampleProject.Tests.csproj

Then you'd set up your PROJECT-path in Application settings for your different Application Services like this:

  • Function App: "src/ExampleProject.FunctionsApp"
  • Web App: "src/ExampleProject.WebApp"
  • API App: "src/ExampleProject.WebApiApp"

With the paths relative to the Git-repository's root-path. You can also point directly to the .csproj-file, if there is any risk of ambiguity in the same file-folder.

When this is done you can configure your Azure App Services for Continuous Deployment using the same repository, in GitHub, Bitbucket, local Git or any other source supported in Azure.

2017-12-06

Convert C# Anonymous (or Any) Types Into Dynamic ExpandoObject

There are scenarios when you need to convert an anonymous type in C#, or any other type, into a dynamic, or more specifically to the underlying ExpandoObject-type.

My specific need was to be able to move the data from an anonymous type from the current assembly into a dynamically executed external assembly. So I created an extension-method for this, which moves all the properties from any object into a new ExpandoObject.

public static ExpandoObject ToExpandoObject(this object obj)
{
    // Null-check

    IDictionary expando = new ExpandoObject();

    foreach (PropertyDescriptor property in TypeDescriptor.GetProperties(obj.GetType()))
    {
        expando.Add(property.Name, property.GetValue(obj));
    }

    return (ExpandoObject) expando;
}

You can use the extension-method on any type of object and choose to reference the resulting type by it's actual type ExpandoObject or as a dynamic.

var anonymous = new {Id = 123, Text = "Abc123", Test = true};

dynamic dynamicObject = anonymous.ToExpandoObject();
ExpandoObject expandoObject = anonymous.ToExpandoObject();

Since the code uses the type System.ComponentModel.TypeDescriptor, if you use .NET Core or .NET Standard, you might need to reference the Nuget-package named System.ComponentModel.TypeConverter.

2017-11-30

KeyLocks: Lock .NET/C#-code on Specific Values

If you've ever needed to ensure that multiple threads are not running the same code, you've probably used a lock-statement in your .NET/C#-code.

Sometimes a regular lock can be too aggressive and lock too much running code for too long. You can solve this by cleverly locking on unique objects, but that handling is complex, error-prone and can become tedious.

Many times you know that you have a specific value or ID which is the key you want to lock on. For instance, you might want your code to not write to the database from multiple actions performed in parallel on your web-application. Using the Nuget-package KeyLocks will give you easy to write syntax to handle this:

private static KeyLock<string> _keyLock = new KeyLock<string>();

public void Main()
{
    Parallel.Invoke(
        () => { UpdateData("entity-123", "First new value"); },
        () => { UpdateData("entity-123", "Second new value"); }, // This will await line above
        () => { UpdateData("another-entity-456", "Another new value"); },        
        () => { UpdateData("yet-another-entity-789", "Yet another new value"); });
}

private void UpdateData(string id, string value)
{
    _keyLock.RunWithLock(id, () =>
    {
        // Execute locked code
    });
}

Make sure the instance of KeyLock<T> is shared between threads executing the code you want to lock on. In this case, I solved it by making the instance static and therefore shared across all instances of the code using it.

The package also contains the type NameLock is a short-hand term for KeyLock<string>. It defaults to being case-sensitive, but that can be changed by passing the correct IEqualityComparer<T> as a constructor-argument like this:

var nameLock = new NameLock(StringComparer.InvariantCultureIgnoreCase)

See the README-file on GitHub for the latest detailed information about KeyLocks. Or try it out through Nuget by running Install-Package KeyLocks in your project. You can even follow the absolutely latest build on MyGet.

2017-11-28

C# DateTime to RFC3339/ISO 8601

According to Wikipedia the date and time-format RFC3339/ISO 8601 usages includes:

On the Internet, the World Wide Web Consortium (W3C) uses ISO 8601 in defining a profile of the standard that restricts the supported date and time formats to reduce the chance of error and the complexity of software.

My specific need to format a System.DateTime-value in a RFC3339-format came when I used one of Google's REST APIs and they required a parameter in the RFC3339-format. Here is the code is the extension-method which provides the functionality of formatting a DateTime as a string in RFC3339-format:

public static string ToRfc3339String(this DateTime dateTime)
{
    return dateTime.ToString("yyyy-MM-dd'T'HH:mm:ss.fffzzz", DateTimeFormatInfo.InvariantInfo);
}

2017-11-24

Convert C# URI/URL to Absolute or Relative

There are many situations when you handle URLs or URIs in applications today, no matter if it's a web-application or not. Often you need to handle absolute URLs, like https://testsite.com/section/page, and relative URLs, like /section/page.html.

To easily convert URLs between absolute and relative, or just ensure these two formats, I created extension-methods for the type System.Uri, which allows you to write code like this:

var absoluteToRelative = new Uri("https://www.test-relative.com/customers/details.html").ToRelative();
// Outputs: "/customers/details.html"

var relativeToAbsolute = new Uri("/orders/id-123/", UriKind.Relative).ToAbsolute("https://www.test-absolute.com");
// Outputs: "https://www.test-absolute.com/orders/id-123/"

The extension-methods which makes this possible are the following:

public static string ToRelative(this Uri uri)
{
    // Null-check

    return uri.IsAbsoluteUri ? uri.PathAndQuery : uri.OriginalString;
}

public static string ToAbsolute(this Uri uri, string baseUrl)
{
    // Null-checks

    var baseUri = new Uri(baseUrl);

    return uri.ToAbsolute(baseUri);
}

public static string ToAbsolute(this Uri uri, Uri baseUri)
{
    // Null-checks

    var relative = uri.ToRelative();

    if (Uri.TryCreate(baseUri, relative, out var absolute))
    {
        return absolute.ToString();
    }

    return uri.IsAbsoluteUri ? uri.ToString() : null;
}

2017-11-20

Registering Autofac & AutoMapper Circularly

Have you ever wanted to register Autofac and AutoMapper circularly? By this I mean to do the inception of these two things, at the same time, in the same application:

  • Register AutoMapper's mappings through Autofac's component-registration for dependency-injection
  • Use registered components in Autofac for dependency-injection into AutoMapper's mapped objects

This is actually possible! It's done by providing AutoMapper with Autofac's IComponentContext-object, which is not dependent on if you've registered everything you need in the Autofac component-registrations, before configuring AutoMapper. So you can register more components after registering your AutoMapper-configuration and still access all these in your AutoMapper context when they get resolved later in your code.

We'll start with the code for registering the Autofac-components and follow it with some explaining:

public IContainer RegisterComponents()
{
    var builder = new ContainerBuilder();

    builder.RegisterType<PreMapperComponent>().As<IPreMapperComponent>();

    builder.Register(ConfigureMapper).SingleInstance();

    builder.RegisterType<PostMapperComponent>().As<IPostMapperComponent>();

    return builder.Build();
}

private IMapper ConfigureMapper(IComponentContext context)
{
    var configuration = new MapperConfiguration(config =>
    {
        var ctx = context.Resolve<IComponentContext>();

        config.CreateMap<EntityType, DtoType>()
            .ConstructUsing(_ =>
                new DtoType(ctx.Resolve<IPreMapperComponent>(), ctx.Resolve<IPostMapperComponent>()));
    });

    return configuration.CreateMapper();
}

The method RegisterComponents is included to show a somewhat realistic scenario, and for this case specifically showing that you can register components in Autofac both before and after configuring AutoMapper.

The code var ctx = context.Resolve<IComponentContext>() might look strange, but is crucial for this solution to work. Why not use the context-argument directly in the ConfigureMapper-method? Because it will throw an exception starting with This resolve operation has already ended, and instructs you to resolve IComponentContext again, which is what we're doing here.

Running the AutoMapper-code

Then we run the code using AutoMapper and the mapping of types needing dependency-injection of constructor-parameters:

public static void Run(IContainer container)
{
    var mapper = container.Resolve<IMapper>();

    var source = new EntityType(123, "Test-text", "Test-description");

    var dto = mapper.Map<DtoType>(source);

    dto.RunComponents();
}

The code dto.RunComponents() is the one that executes the injected implementations of the interfaces IPreMapperComponent and IPostMapperComponent used in the type DtoType.

You can find all the code-files involved in this example in this Gist.

This can all also be done through the recommended approach of Modules in Autofac and Profiles in AutoMapper.

2017-11-15

C# Clamp: Limit IComparable Between Two Values

If you've ever needed to limit a value between two known limits of values, then you have been looking for Clamping.

Sometimes when you do calculations on values you know that the result should not fall outside two specific values. For example, if your calculating a percentage-value as an int-value, then you know the result should be between 0 and 100.

public int GetPercentage(int val1, int val2)
{
    // TODO: Check for 0 on val2-parameter

    var calculation = val1 / val2;
    var ensuredPercentage = calculation.Clamp(0, 100);
    return ensuredPercentage;
}

This functionality can easily be extended to all classes which inherits from System.IComparable<T>, which are for example all types of numbers like int, double, long and so on, but also DateTime and more.

The following extension-method adds the Clamp-method to all objects of types inheriting from IComparable<T>:

public static T Clamp<T>(this T value, T min, T max)
    where T : IComparable<T>
{
    var comparer = Comparer<T>.Default;

    if (comparer == null)
        throw new ArgumentException($"Failed to get default comparer for type '{typeof(T).FullName}'.");

    var isMinGreaterThanMax = comparer.Compare(min, max) > 0;

    if (isMinGreaterThanMax)
    {
        throw new ArgumentOutOfRangeException(
            nameof(min),
            "Minimum value cannot be larger than maximum value.");
    }

    var isValueLessThanMin = comparer.Compare(value, min) < 0;
    var isValueGreaterThanMax = !isValueLessThanMin && comparer.Compare(value, max) > 0;

    return isValueLessThanMin ? min : (isValueGreaterThanMax ? max : value);
}

2017-05-18

ASP.NET Core MVC SEO-Framework

Following my last post on my ASP.NET MVC SEO-Framework I started looking at adding support also for ASP.NET Core MVC, with its superior Dependency Injection and Tag Helpers.

The previous post shows examples on how to use attributes to set SEO-specific values for Controller-Actions and in Views, which is also used in ASP.NET Core MVC. What is new to Core MVC is how you register the SEO-helper as a Service for Dependency Injection and use Tag Helpers instead of HTML Helpers.

To register the SEO-helper as a service for Dependency Injection you just need to use the framework's provided extension-method in the ConfigureServices-method inside Startup.cs:

public class Startup
{
    public void ConfigureServices(IServiceCollection services)
    {
        services.AddMvc();

        services.AddSeoHelper();
    }
}

These SEO-values can easily be accessed and rendered as HTML-tags inside Views through provided Tag Helpers:

<head>
    <seo-title />

    <seo-link-canonical />
    <seo-meta-description />
    <seo-meta-keywords />
    <seo-meta-robots-index />
</head>

To access these Tag Helpers you need to reference them in you _ViewImports.cshtml:

@addTagHelper *, AspNetSeo.CoreMvc
@addTagHelper *, Microsoft.AspNetCore.Mvc.TagHelpers

See the README-file on GitHub for the latest detailed information about this ASP.NET SEO-framework. Or try it out through Nuget by running Install-Package AspNetSeo.CoreMvc or Install-Package AspNetSeo.Mvc in your project. You can even follow the absolutely latest build on MyGet.

2017-01-18

ASP.NET MVC SEO-Framework

For any serious web-application you should always implement a solid Search engine optimization-strategy, but there is no standardized way to handle this in ASP.NET MVC, out of the box.

You could easily use the ViewBag-object to send dynamic values from Controller-Actions into Views, like this, for example:

public ActionResult Index()
{
    this.ViewBag.PageTitle = "This is the page title";

    return this.View();
}

Then you'd have to make sure you correctly spell or copy-paste ViewBag.PageTitle correctly into your View:

<head>
    <title>@ViewBag.PageTitle</title>
    <!-- More head-values -->
</head>

One problem is that if you refactor the naming for ViewBag.PageTitle into, for example ViewBag.Title, this will break the functionality, potentially website-wide, because you won't get any tooling-help from Visual Studio for that rename.

This is why I created a framework for ASP.NET MVC SEO, to get structured and reusable functionality around the SEO-data for a web-application. The framework is available on Nuget, with the source-code on GitHub.

Setting SEO-values

You can set SEO-values using the properties on a SeoHelper-object in Controller-Actions and Views, or you can use ActionFilter-attributes in Controllers, to set SEO-related data like:

  • Meta-Description
  • Meta-Keywords
  • Title, split on page-title and base-title (website-title)
  • Canonical Link
  • Meta No-index for robots

This can be done inside Controllers and Controller-Actions:

[SeoBaseTitle("Website name")]
public class InfoController : SeoController
{
    [SeoTitle("Listing items")]
    [SeoMetaDescription("List of the company's product-items")]
    public ActionResult List()
    {
        var list = this.GetList();

        if (list.Any())
        {
            this.Seo.Title += $" (Total: {list.Count})";
            this.Seo.LinkCanonical = "~/pages/list.html";
        }
        else
        {
            this.Seo.MetaRobotsNoIndex = true;
        }

        return this.View(model);
    }
}

If you don't want to inherit from SeoController to get access to the this.Seo-property, you can use the extension-method GetSeoHelper:

public class InfoController : Controller
{
    public ActionResult List()
    {
        var seo = this.GetSeoHelper();

        seo.Title = "Page title";

        return this.View(model);
    }
}

You can even set SEO-values inside Views:

@{
    this.Layout = null;
    this.Seo.MetaRobotsNoIndex = true; // Always block Robots from indexing this View
}

Rendering SEO-values

These SEO-values can easily be accessed and rendered as HTML-tags inside Views through provided HtmlHelper-extensions:

<head>
    @Html.SeoTitle()

    @Html.SeoLinkCanonical()
    @Html.SeoMetaDescription()
    @Html.SeoMetaKeywords()
    @Html.SeoMetaRobotsIndex()
</head>

See the README-file on GitHub for the latest detailed information about this ASP.NET MVC SEO-framework. Or try it out through Nuget by running Install-Package AspNetSeo.Mvc in your project. You can even follow the absolutely latest build on MyGet.

2016-03-08

Display Local DateTime with Moment.js in ASP.NET

Moment.js

Displaying a DateTime in local format in C# is relatively easy, but it will only use the server's settings to tell what "local" is.

For example, you might want 2016-03-07 14:35 UTC to show as 2016-03-07 15:35 for a visitor from a CET-timezone.

If you want to dynamically show the local date and time you can use the web-client's information through JavaScript and format it with Moment.js, for any user, anywhere in the world.

To do this in a way that is fault-tolerant and also SEO-friendly I want the UTC-DateTime to be hard-coded in the HTML and let Moment.js format it on the fly, when the page loads. To do this I need to populate my .cshtml-file with the following:

<span class="local-datetime"
        title="@(Model.DateUtc.ToString("yyyy-MM-dd HH:mm")) UTC"
        data-utc="@(Model.DateUtc.GetEpochTicks())">
    @(Model.DateUtc.ToString("yyyy-MM-dd HH:mm")) UTC
</span>

Make sure you run .ToUniversalTime() on your DateTime first.

Notice the .GetEpochTicks()-extension method. It makes sure the format of the DateTime is passed in a format that Moment.js can handle easily. The implementation looks like this:

private static readonly DateTime Epoch = new DateTime(1970, 1, 1, 0, 0, 0, DateTimeKind.Utc);

public static double GetEpochTicks(this DateTime dateTime)
{
    return dateTime.Subtract(Epoch).TotalMilliseconds;
}

The last step is to tell Moment.js to format our DateTime to a local format:

$('.local-datetime').each(function() {
    var $this = $(this), utcDate = parseInt($this.attr('data-utc'), 10) || 0;

    if (!utcDate) {
        return;
    }

    var local = moment.utc(utcDate).local();
    var formattedDate = local.format('YYYY-MM-DD HH:mm');
    $this.text(formattedDate);
});

If this (or other, unrelated) JavaScript-code would fail for any reason the UTC-DateTime is the actually HTML-content and will still be displayed.

2015-03-25

NullableGuidConstraint for ASP.NET MVC & WebApi

Have you ever written a very usable Route-constraint in ASP.NET MVC or in WebAPI than you wanted to share between them both? For example a constraint that supports nullable Guids (Guid?) as route-parameter.

This can be done by implementing both System.Web.Routing.IRouteConstraint and System.Web.Http.Routing.IHttpRouteConstraint.

Hopefully this article will be obsolete with the release of ASP.NET 5, but until then, here's how you solve this problem:

public class NullableGuidConstraint : IRouteConstraint, IHttpRouteConstraint
{
    // ASP.NET MVC-signature
    public bool Match(
        HttpContextBase httpContext,
        Route route,
        string parameterName,
        RouteValueDictionary values,
        RouteDirection routeDirection)
    {
        return MatchInternal(parameterName, values);
    }

    // WebAPI-signature
    public bool Match(
        HttpRequestMessage request,
        IHttpRoute route,
        string parameterName,
        IDictionary values,
        HttpRouteDirection routeDirection)
    {
        return MatchInternal(parameterName, values);
    }

    private static bool MatchInternal(string parameterName, IDictionary values)
    {
        object value;
        if (!values.TryGetValue(parameterName, out value))
        {
            return false;
        }

        if (value is Guid)
        {
            return true;
        }

        string stringValue = Convert.ToString(value, CultureInfo.InvariantCulture);

        Guid guid;
        bool isMatch = string.IsNullOrWhiteSpace(stringValue) || Guid.TryParse(stringValue, out guid);
        return isMatch;
    }
}

Then you register this constraint through, for example, DefaultInlineConstraintResolver in System.Web.Mvc.Routing for ASP.NET MVC and System.Web.Http.Routing for WebAPI.

var constraintResolver = new DefaultInlineConstraintResolver();
constraintResolver.ConstraintMap.Add("guid?", typeof(NullableGuidConstraint));

// ASP.NET MVC
routes.MapMvcAttributeRoutes(constraintResolver);

// WebAPI
routes.MapHttpAttributeRoutes(constraintResolver);

Now you can write attribute-routes like this:

[Route("{controller}/{action}/{id=guid?}")]